Company Settings
The Company Settings section stores your organization’s core identification and contact details. These data are used across the application, especially on printouts, invoices, job cards, and official documents.
Accessing Company Settings
To view or change these settings:
- Open the Main Menu
- Go to Settings
- Select Company
This opens the Company settings window, where you can customize your organization’s contact details.
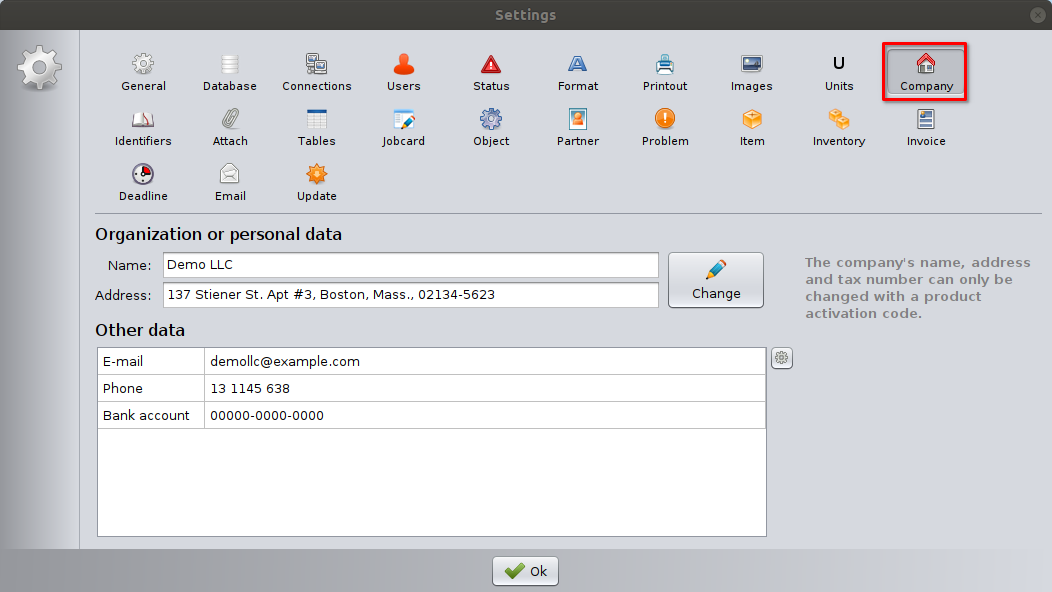
Organization or Personal Data
This section contains the primary company identification data.
Name
The official name of the company or individual.
- This name appears on printouts and documents.
- It is part of the licensed company identity.
Address
The registered address of the company.
- Displayed on printed documents such as job cards and invoices.
- Should match the official business address.
Changing name and address
The Change button is used to modify the company’s name and address.
⚠️ Important: The company name, address, and tax number can only be changed using a valid product activation code. This prevents unauthorized modification of licensed company data.
Other Data
This section contains additional company information that can be customized and extended.
By default, it includes fields such as:
- E-mail – company contact email
- Phone – main phone number
- Bank account – bank account number
These fields are typically used on documents and printouts.
Customizing the Other Data Table
The Other data section is fully configurable using the data table settings menu.
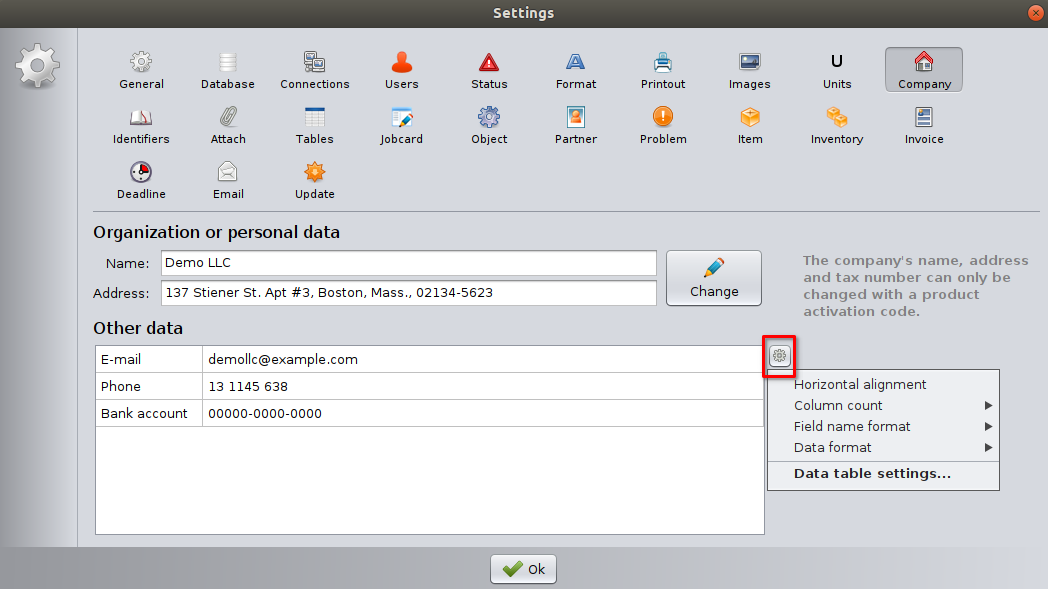
Opening data table settings
Click the settings (gear) icon next to the Other data table, then select Data table settings.
This opens the Edit data table window.
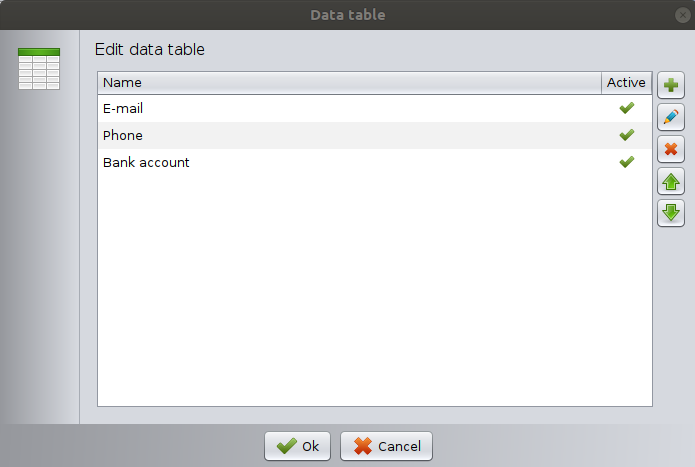
Edit Data Table Window
In the Edit data table window, you can control which fields appear and in what order.
Field list
Each row represents a data field (for example: Name, E-mail, Phone, Bank account).
- The Active column shows whether the field is visible and usable.
- Active fields appear in the Company settings screen.
Add a new field
Click the New (+) button to create a new custom field.
Examples:
- VAT number
- Website
- Registration number
Edit a field
Select a field and click the Edit (pencil) button to modify its name or properties.
Remove a field
Select a field and click the Delete (×) button.
⚠️ Removing a field hides it from the interface but does not affect previously printed documents.
Change field order
Use the Up and Down arrow buttons to reorder fields.
The order here defines how fields appear in the Company settings screen and on printouts.
Saving Changes
- Click OK in the Edit data table window to save field changes.
- Click OK in the Company Settings window to apply all modifications.
Changes take effect immediately.
Visibility of “Other Data” on Printouts
Even if company information is correctly filled in the Other data section, it will only appear on printouts if it is enabled in the printout settings of the given document type.
For example, in the Invoice printout:
- Open Main Menu → Settings → Printout.
- Select Invoice module / Invoice from the printout selector.
- Choose the Seller section. (Contractor on other printouts)
- Enable the required fields (such as E-mail, Phone, or Bank account) by checking the corresponding options.

Only the fields that are enabled here will be displayed on the invoice printout.
Best Practices
- Keep company name and address consistent with official registration data.
- Add only relevant fields to avoid clutter.
- Use clear, short field names for better printout readability.
- Restrict access to Company settings to authorized users only.
Notes
- The Organization or Personal data section is global and shared across the entire system.
- The Other data section, however, can be different on each computer when the application is used in network (server–client) mode.
- This allows each workstation to store and display its own local contact or reference information without affecting other computers in the network.
- Historical documents are not modified when settings change.
- Activation-controlled fields are protected to ensure licensing integrity.
Troubleshooting: Company “Other Data” Does Not Appear on Printouts
Problem
You enter company information in the Other data section, but the values do not appear on printouts (such as job cards or invoices).
Most Common Cause
The data was accidentally entered into the field name instead of the field value.
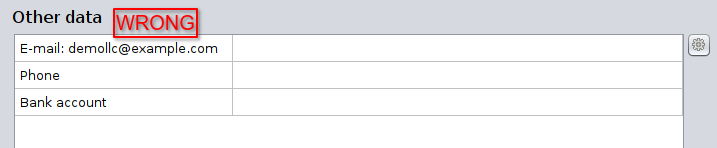

In the Other data table:
- The left column defines the field name (label).
- The right column contains the actual data that appears on printouts.
If you type information (for example an email address or phone number) into the field name, the system treats it as a label — not as printable data.
How to Recognize This Issue
You may notice one or more of the following:
- The field label looks like an email address, phone number, or bank account number.
- The corresponding value field is empty.
- On Printouts nothing appears at all.
How to Fix the Problem
- Open Settings → Company.
- In the Other data section, locate the affected row.
- Check whether the information is typed into the field name instead of the value field.
- If necessary:
- Open Data table settings.
- Rename the field to a proper label (for example: E-mail, Phone, Bank account).
- Click OK
- Enter the actual data into the value column.
- Click OK to save the changes.
- Print the document again to verify the result.
Other Causes
Visibility of the Data fields are not enabled in the Printout settings. Please see the Printout settings.