Email Settings
The Email Settings section allows you to configure the outgoing email server used by the application to send emails directly (for example, invoices, job cards, reports, or notifications).
Proper configuration ensures that documents can be sent quickly and reliably to customers.
Accessing Email Settings
To view or change these settings:
- Open the Main Menu
- Go to Settings
- Select Email
This opens the Email settings window.
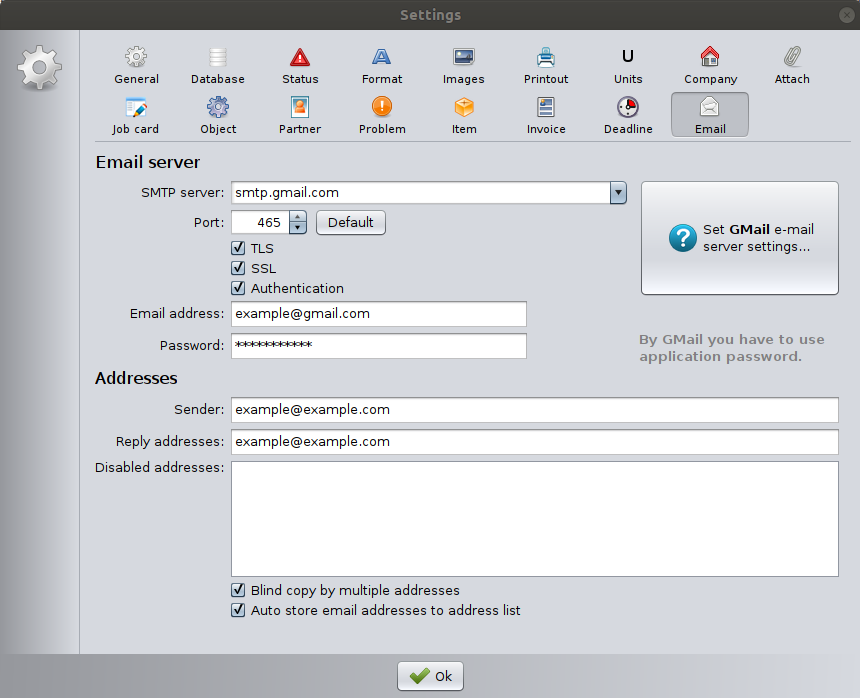
Email Server Configuration
This section defines the SMTP (Simple Mail Transfer Protocol) server used for sending emails.
SMTP Server
Enter the address of your email provider’s outgoing mail server.
Examples:
smtp.gmail.comsmtp.office365.commail.yourdomain.com
This information is provided by your email service provider.
Port
Defines the communication port used for sending email.
Common values:
- 465 (SSL)
- 587 (TLS)
Click Default to automatically set the recommended port for the selected server.
TLS / SSL
Enable the appropriate security protocol required by your email provider.
- TLS – Modern encryption standard (commonly used with port 587)
- SSL – Secure connection (commonly used with port 465)
Most providers require at least one secure connection method.
Authentication
When enabled, the application logs in to the email server using credentials.
This is required by almost all modern email providers.
Email Address
Enter the email account used to send messages.
Example:
info@yourcompany.com
Password
Enter the password for the email account.
⚠️ Important (Gmail users):
You must use an Application Password, not your regular Gmail password.
Addresses
This section defines sender and reply settings.
Sender
Defines the email address shown as the sender in outgoing messages.
This may differ from the login email address if your provider allows it.
Reply Addresses
Defines the address where recipients’ replies will be sent.
Disabled Addresses
Addresses listed here will not be available for sending emails.
Useful for:
- Blocking internal addresses
- Preventing accidental sending to certain contacts
Additional Options
Blind copy by multiple addresses
When enabled, emails sent to multiple recipients will use BCC (Blind Carbon Copy) instead of visible CC.
Benefits:
- Protects recipient privacy
- Prevents sharing email addresses between customers
Auto store email addresses to address list
When enabled, email addresses used for sending are automatically saved to the internal address list for future use.
This speeds up future email sending.
Saving Settings
Click OK to save the email configuration.
It is recommended to test email sending after configuration.
Example: Gmail Configuration
For Gmail accounts:
- SMTP server:
smtp.gmail.com - Port:
465 - SSL: enabled
- Authentication: enabled
- Use an Application Password
Creating Application Password for your Gmail account
By default, Gmail blocks connections made using the traditional SMTP protocol when standard account passwords are used. To allow the connection, you must log in to your Google Account security settings and create an App Password for the program you want to use.
Important: To create an App Password, you must have 2-Step Verification enabled on your Google Account.
If you are using 2-Step Verification and receive a “Password incorrect” error when signing in, you need to use an App Password instead of your regular account password.
Steps to create an App Password:
- Go to your Google Account.
- Select Security.
- Under “Signing in to Google”, select 2-Step Verification.
- At the bottom of the page, select App passwords.
You can also use the following link to create the app password:
https://myaccount.google.com/u/2/apppasswords - Enter a name to help you remember where you will use the App Password (for example, “JobCard SMTP”).
- Click Generate.
- Google will generate a 16-character App Password.
- Enter this password into the program.
⚠️ Important:
Enter the App Password into the program without any spaces.
If you copy and paste the password directly, it may include spaces, which will cause authentication to fail.
Troubleshooting
Emails are not sent
Check:
- SMTP server address
- Correct port number
- TLS/SSL configuration
- Authentication enabled
- Correct email and password
- Firewall allowing outbound SMTP traffic
Gmail login fails
Ensure:
- Two-factor authentication is enabled
- An Application Password is generated
- The correct app password is entered