Printout settings
The Printout Settings window allows you to control the layout, content, and appearance of printed documents generated by the application. Using these settings, you can decide what information appears, how it is formatted, and how headers and footers are displayed.
These settings help you create clear, professional-looking printouts that match your company’s requirements.
Accessing Printout Settings
To view or change how printouts appear:
- Open the Main Menu
- Go to Settings
- Select Printout
This opens the Printout settings window.
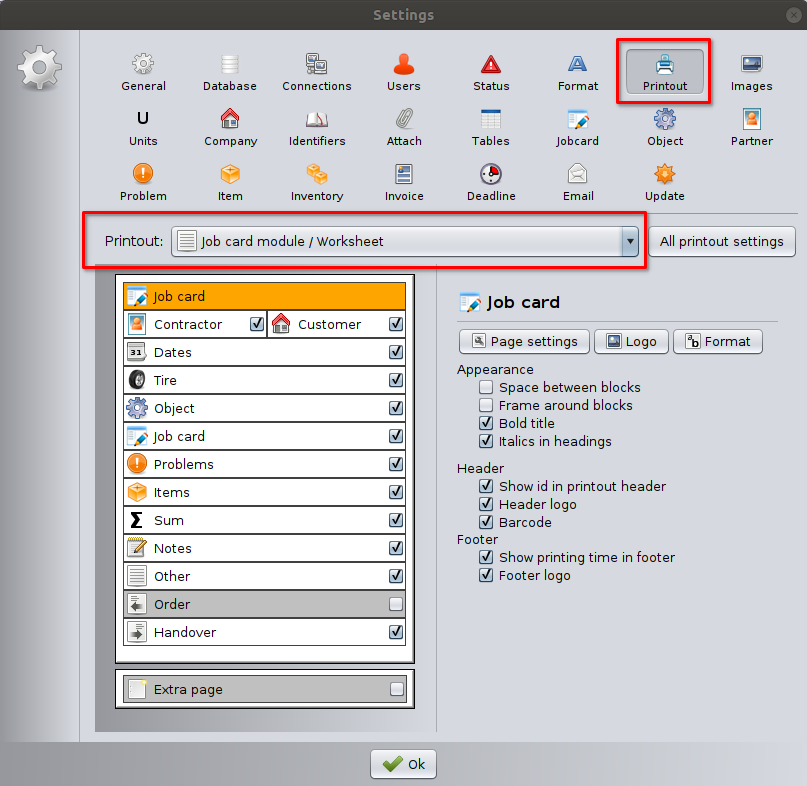
Selecting a Printout Type
At the top of the window, you can choose which printout you want to configure.
Printout selector
Use the dropdown list to select a document type, for example:
- Job card module / Worksheet
- Invoice
- Inventory documents
- Other module-specific printouts
Each printout type has its own independent settings. Changes apply only to the selected printout.
All printout settings
Click this button to access global printout options that apply across multiple document types.
Printout Structure (Left Panel)
Each block represents a logical part of the document, such as:
- Contractor
- Customer
- Dates
- Tire
- Object
- Job card
- Problems
- Items
- Sum
- Notes
- Order
- Handover
Enabling or disabling blocks
- Checked blocks will appear on the printout.
- Unchecked blocks will be hidden.
This allows you to remove unnecessary sections and simplify the document.
Extra page
The Extra page option adds an additional page to the printout, which can be used for extended notes, attachments, or additional information.
The left panel shows the structure of the selected printout as a list of blocks or sections.
Printout Appearance (Right Panel)
The right panel controls the visual appearance of the selected printout.
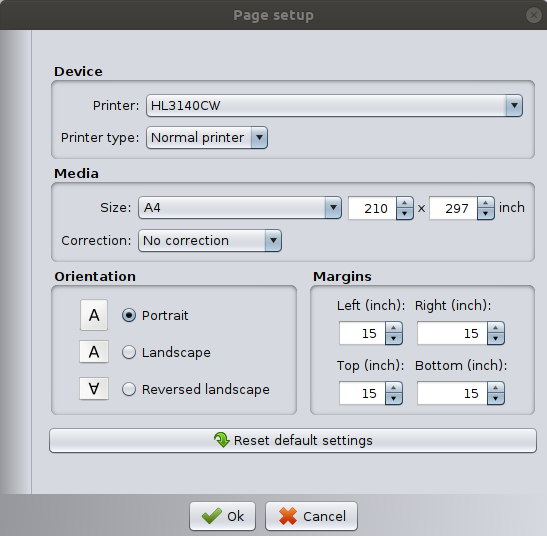
Page settings
The Page Setup window allows you to configure printer-specific and page-layout options for printed documents. These settings determine how the document is placed on paper, including printer selection, paper size, orientation, and margins.
Logo
Allows you to add or change the logo displayed on the printout.
- Logos can appear in the header or footer, depending on settings.
- Useful for branding and official documents.
To change the printout logos and see the Images Settings.
Format
Opens formatting options and allows you to control how numbers, dates, times, and timestamps appear on printed documents. For more information visit Format settings.
Appearance Options
These settings affect the visual style of the document:
- Space between blocks
Adds extra spacing between sections for improved readability. - Frame around blocks
Draws borders around individual sections. - Bold title
Displays section titles in bold text. - Italics in headings
Displays headings in italic style.
Header Settings
These options control what appears in the document header:
- Show ID in printout header
Displays the document identifier in the header. - Header logo
Displays the company logo at the top of the document. - Barcode
Prints a barcode representing the document identifier.
Footer Settings
These options control what appears in the document footer:
- Show printing time in footer
Displays the date and time when the document was printed. - Footer logo
Displays the company logo in the footer area.
Saving Changes
Click OK to save your printout settings and apply them immediately.
Best Practices
- Customize printouts separately for each document type.
- Remove unused blocks to keep documents clean and readable.
- Use headers and footers consistently for official documents.
- Test printouts after changes to ensure the layout meets expectations.
Accessing Printout Settings from the Print Window
In addition to opening printout settings from the main Settings → Printout menu, you can also access document-specific printout settings directly from the print preview window.
This method is often faster when you want to adjust the layout while preparing a document for printing.
Step 1: Open the Print Preview
Select a record (for example, a job card) and click the Print icon in the toolbar then select the Job card document.
This opens the Print Job Card window with a preview of the document.
Step 2: Open Customize Settings
In the print preview window, click the Customize button in the toolbar.
This button opens the printout customization settings for the currently selected document type.

When to Use This Method
This access method is recommended when:
- You want to fine-tune the layout while viewing the print preview
- You need to quickly hide or show sections before printing
- You want to test layout changes immediately without leaving the print window
⚠ Note: Changes made through the Customize button are saved and reused for future printouts of the same document type.